Golang sync.Cond 条件变量源码分析
sync.Cond 条件变量是 Golang 标准库 sync 包中的一个常用类。sync.Cond 往往被用在一个或一组 goroutine 等待某个条件成立后唤醒这样的场景,例如常见的生产者消费者场景。
本文将基于 go-1.13 的源码 分析 sync.Cond 源码,将会涉及以下知识点:
- sync.Cond 的基本用法
- sync.Cond 的底层结构及原理分析
- sync.Cond 的惯用法及使用注意事项
sync.Cond 的基本用法
在正式讲 sync.Cond 的原理之前,我们先看下 sync.Cond 是如何使用的。这里我给出了一个非常简单的单生产者多消费者的例子,代码如下:
1 | var mutex = sync.Mutex{} |
在以上代码中,有一个 producer 的 goroutine 将数据写入到 queue 中,有两个 consumer 的 goroutine 负责从队列中消费数据。而 producer 和 consumer 对 queue 的读写操作都由 sync.Mutex 进行并发安全的保护。
其中 consumer 因为需要等待 queue 不为空时才能进行消费,因此 consumer 对于 queue 不为空这一条件的等待和唤醒,就用到了 sync.Cond。
我们看下 sync.Cond 接口的用法:
sync.NewCond(l Locker): 新建一个 sync.Cond 变量。注意该函数需要一个 Locker 作为必填参数,这是因为在cond.Wait()中底层会涉及到 Locker 的锁操作。cond.Wait(): 等待被唤醒。唤醒期间会解锁并切走 goroutine。cond.Signal(): 只唤醒一个最先 Wait 的 goroutine。对应的另外一个唤醒函数是Broadcast,区别是Signal 一次只会唤醒一个 goroutine,而Broadcast会将全部 Wait 的 goroutine 都唤醒。
接下来,我们将分析下 sync.Cond 底层是如何实现这些操作的。
sync.Cond 底层原理分析
底层数据结构
sync.Cond 的 struct 定义如下:
1 | type Cond struct { |
其中最核心的就是 notifyList 这个数据结构, 其源码在 runtime/sema.go#L446:
1 | type notifyList struct { |
以上代码中,notifyList 包含两类属性:
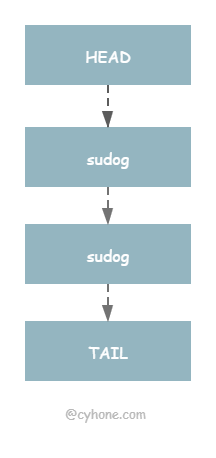
wait和notify。这两个都是ticket值,每次调 Wait 时,ticket 都会递增,作为 goroutine 本次 Wait 的唯一标识,便于下次恢复。 wait 表示下次sync.CondWait 的 ticket 值,notify 表示下次要唤醒的 goroutine 的 ticket 的值。这两个值都只增不减的。利用 wait 和 notify 可以实现 goroutine FIFO式的唤醒,具体见下文。head和tail。等待在这个sync.Cond上的 goroutine 链表,如下图所示:

Wait 操作
我们先分析下当调用 sync.Cond 的 Wait 函数时,底层做了哪些事情。代码如下:
1 | func (c *Cond) Wait() { |
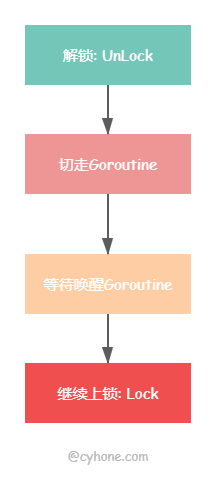
Wait 函数虽然短短几行代码,但里面蕴含了很多重要的逻辑。整个逻辑可以拆分为 4 步:
第一步:调用 runtime_notifyListAdd 获取 ticket。ticket 是一次 Wait 操作的唯一标识,可以用来防止重复唤醒以及保证 FIFO 式的唤醒。
它的生成也非常简单,其实就是对 notifyList 的 wait 属性进行原子自增。其实现如下:
1 | func notifyListAdd(l *notifyList) uint32 { |
第二步:c.L.Unlock() 先把用户传进来的 locker 解锁。因为在 runtime_notifyListWait 中会调用 gopark 切走 goroutine。因此在切走之前,必须先把 Locker 解锁了。要不然其他 goroutine 获取不到这个锁,将会造成死锁问题。
第三步:runtime_notifyListWait 将当前 goroutine 加入到 notifyList 里面,然后切走goroutine。下面是 notifyListWait 精简后的代码:
1 | func notifyListWait(l *notifyList, t uint32) { |
从以上代码可以看出,notifyListWait 的逻辑并不复杂,主要将当前 goroutine 追加到 notifyList 链表最后以及调用 gopark 切走 goroutine。
第四步:goroutine 被唤醒。如果其他 goroutine 调用了 Signal 或者 Broadcast 唤醒了该 goroutine。那么将进入到最后一步:c.L.Lock()。此时将会重新把用户传的 Locker 上锁。
以上就是 sync.Cond 的 Wait 过程,可以简单用下图表示:

Signal:唤醒最早 Wait 的 goroutine
正如最开始的例子中展示的,在 producer 的 goroutine 里面调用 Signal 函数将会唤醒正在 Wait 的 goroutine。而且这里需要注意的是,Signal 只会唤醒一个 goroutine,且该 goroutine 是最早 Wait 的。
我们接下来看下,Signal 是如何唤醒 goroutine 以及如何实现 FIFO 式的唤醒。
代码如下:
1 | func (c *Cond) Signal() { |
我们上面讲 Wait 实现的时候讲到,每次 Wait 的时候,都会同时生成一个 ticket,这个 ticket 作为此次 Wait 的唯一标识。ticket 是由 notifyList.wait 原子递增而来,因此 notifyList.wait 也同时代表当前最大的 ticket。
那么,每次唤醒的时候,也会对应一个 notify 属性。例如当前 notify 属性等于 1,则去逐个检查 notifyList 链表中 元素,找到 ticket 等于 1 的 goroutine 并唤醒,同时将 notify 属性进行原子递增。
那么问题来了,我们知道 sync.Cond 的底层 notifyList 是一个链表结构,我们为何不直接取链表最头部唤醒呢?为什么会有一个 ticket 机制?
这是因为 notifyList 会有乱序的可能。从我们上面 Wait 的过程可以看出,获取 ticket 和加入 notifyList,是两个独立的行为,中间会把锁释放掉。而当多个 goroutine 同时进行时,中间会产生进行并发操作,那么有可能后获取 ticket 的 goroutine,先插入到 notifyList 里面, 这就会造成 notifyList 轻微的乱序。Golang 的官方解释如下:
Because g’s queue separately from taking numbers, there may be minor reorderings in the list.
因此,这种 逐个匹配 ticket 的方式 ,即使在 notifyList 乱序的情况下,也能取到最先 Wait 的 goroutine。
这里有个问题是,对于这种方法我们需要逐个遍历 notifyList, 理论上来说,这是个 O(n) 的线性时间复杂度。Golang 也对这里做了解释:其实大部分场景下只用比较一两次之后就会很快停止,因此不用太担心性能问题。
sync.Cond 的惯用法及使用注意事项
sync.Cond 在使用时还是有一些需要注意的地方,否则使用不当将造成代码错误。
- sync.Cond不能拷贝,否则将会造成
panic("sync.Cond is copied")错误 - Wait 的调用一定要放在 Lock 和 UnLock 中间,否则将会造成
panic("sync: unlock of unlocked mutex")错误。代码如下:
1 | c.L.Lock() |
- Wait 调用的条件检查一定要放在 for 循环中,代码如上。这是因为当 Boardcast 唤醒时,有可能其他 goroutine 先于当前 goroutine 唤醒并抢到锁,导致轮到当前 goroutine 抢到锁的时候,条件又不再满足了。因此,需要将条件检查放在 for 循环中。
- Signal 和 Boardcast 两个唤醒操作不需要加锁。